How to Slice in Canva
To slice text in Canva, add your text and choose a bold font. Use an element like a line or curve to slice the text. To slice images, choose an image and access the ‘Slice’ app to slice images. Adjust the color or slice parameters to achieve the desired effect. Apply your changes to finalize the creative sliced design.
If you don’t have a Canva subscription yet, start with a free trial. There are different ways to access Canva Pro for free.
Table of Contents
ToggleSlicing is a design technique that adds a dash of dynamism to your text and images.
In this post, I will show you the steps on how to slice in Canva, both text and images.
The process is slightly different for both, but super simple. Here goes!
Let’s go over the 2 separate scenarios:
- How to slice text in Canva
- How to slice images in Canva
Watch the video below or read the whole post!
How to slice text in Canva
1. Add the Text
Open your Canva project and click on “Add a text box” from the sidebar to create your text. Type the word you want to apply the sliced effect to, for example, “HELLO”.
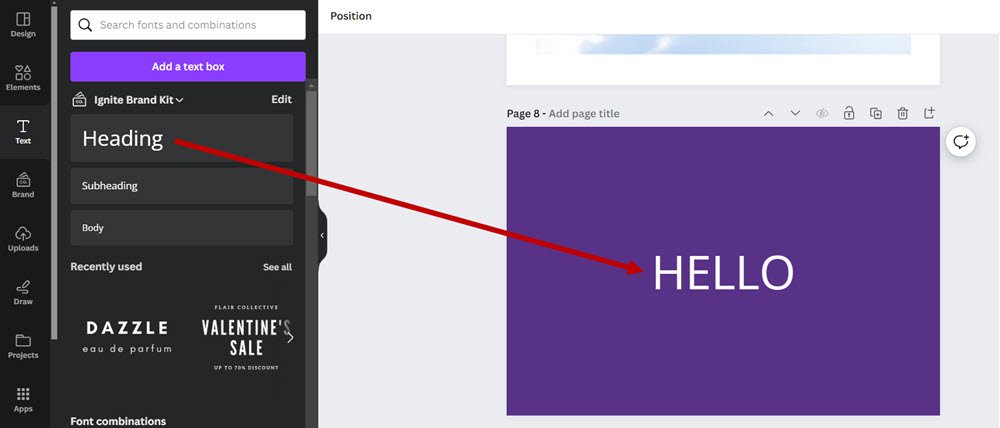
I have added a heading text in this case, but you can just add a new text box as well.
2. Choose Font and Size
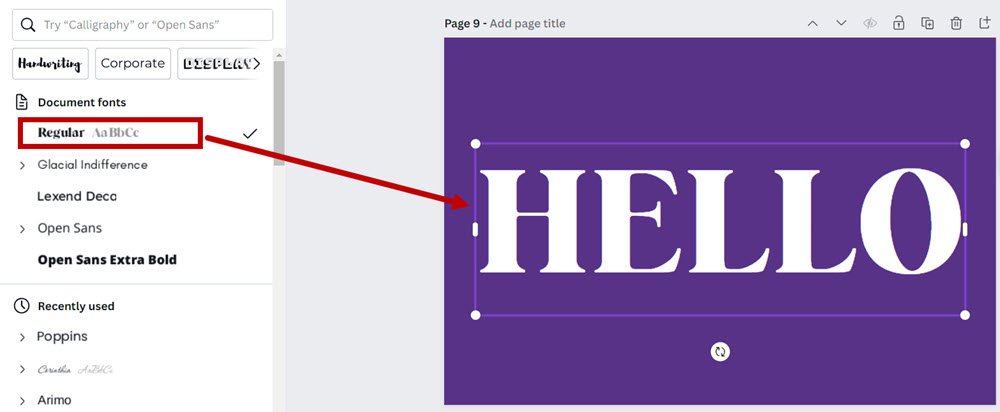
Select a bold font for your text to make the slice effect more visible. Adjust the font size to ensure your text is large enough to manipulate.
3. Selecting the Element for Slicing
In the “Elements” section within Canva, search for an element like a line or curve that you can use to represent where the text will be sliced.
You can choose any element, but a line or curve works best. I have chosen an elegant curve in this example.

4. Apply the Slicing Element
Drag the element you’ve chosen over the text at the point where you want to slice.
Size and rotate it as needed to fit your design.
Pro Tip:
Make sure it’s a graphic whose colors you can change. If you choose an image as a slicing element, you can change the image colors only in a limited way.
It may not give you the effect you need.
5. Adjust Colors if Needed
Change the color of the text or the slicing element to the background color to create a monotone slice effect.
To change the color, select the item and choose a new color from your brand kit or by inputting a hex code.
I have made the background and curve colors the same purple in this case, choosing from my brand kit. You can also click on ‘Document Colors’ to add a custom hex code.
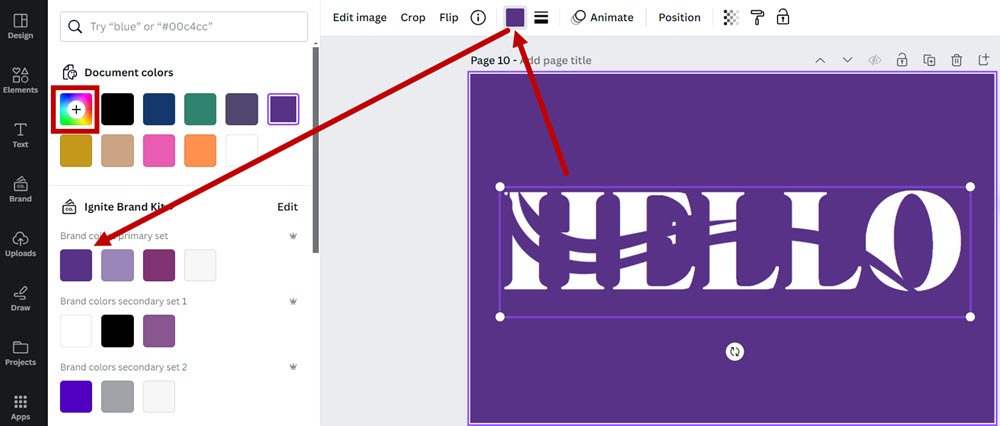
You can also choose a different color, but the effect will look very different. See the example below. A slicing element color different from the background doesn’t look like slicing, to be honest.


30-Day Free Access
Try out all Canva PRO features
- 1-Click Background Remover
- Create Designs in Bulk
- 1-Click Design Resize
- 100M+ Stock Content
- 600K+ Templates
- Transparent background PNG files

30-Day Free Access
Try out all Canva Pro features
- 1-Click Background Remover
- Create Designs in Bulk
- 1-Click Design Resize
- 100M+ Stock Content
- 600K+ Templates
- Transparent background PNG files
If you like playing around with text effects, also check out my post on how to highlight text in Canva.
How to slice images in Canva
Here is a detailed step-by-step process.
1. Select Your Image
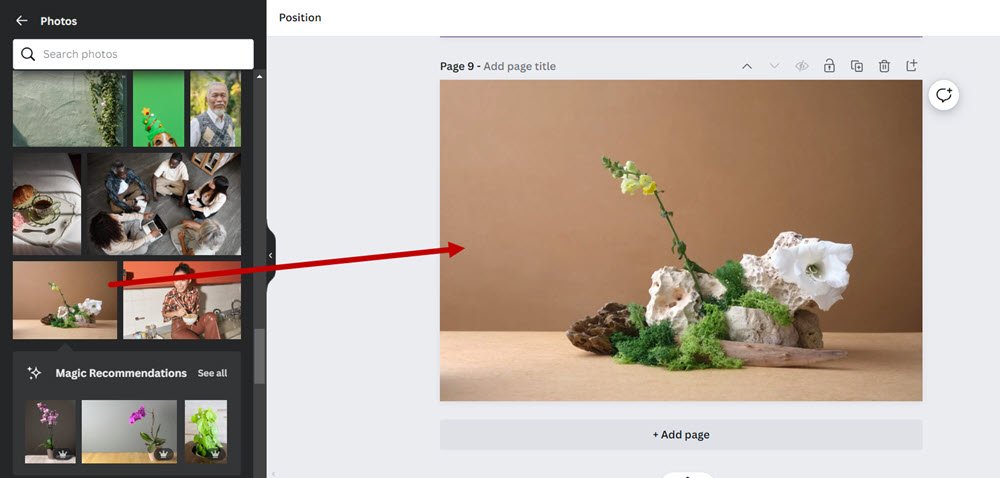
Begin by adding the image you want to slice to your Canva project.
You can do this by searching in the ‘Photos’ section and dragging your selected image onto the canvas.
2. Locate the Slice App
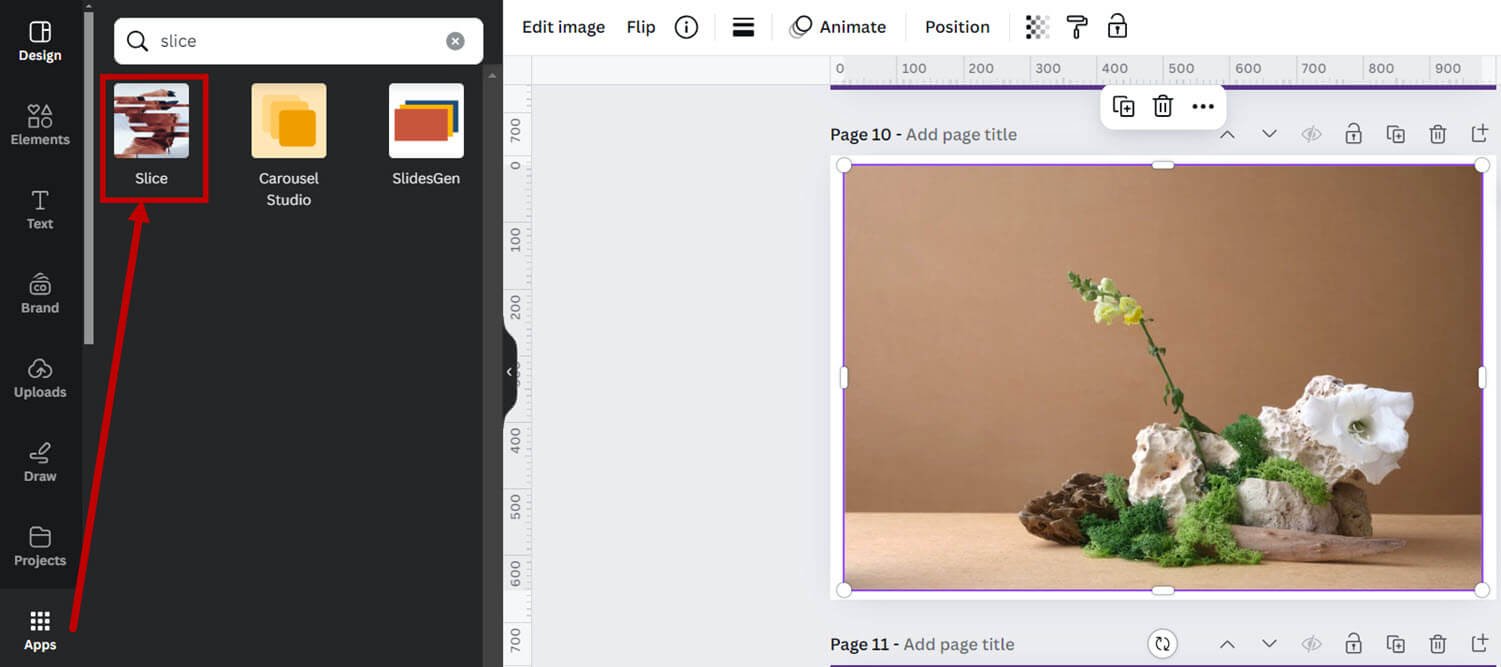
Search for the ‘Slice’ app under Apps.
Pro Tip:
Canva is a paid tool, but the Slice app is available in the free version as well.
Related: How much does Canva cost?
3. Apply the Slice App
Once you’ve found the ‘Slice’ app, click on it to apply it to your image. You may see a preview or need to click ‘Open’ to launch the slicing tool.

Pro tip:You have to select an image to apply the Slice effect. Otherwise you will get an error message asking you to select the image.
So to apply the Slice effect to an image, you can also click on an image first, then click on Edit > Apps > Slice.
Once you choose the Slice app, you will see a choice between the different types of slice effects:
- Chipped
- Sliced
- Minced
- Torn
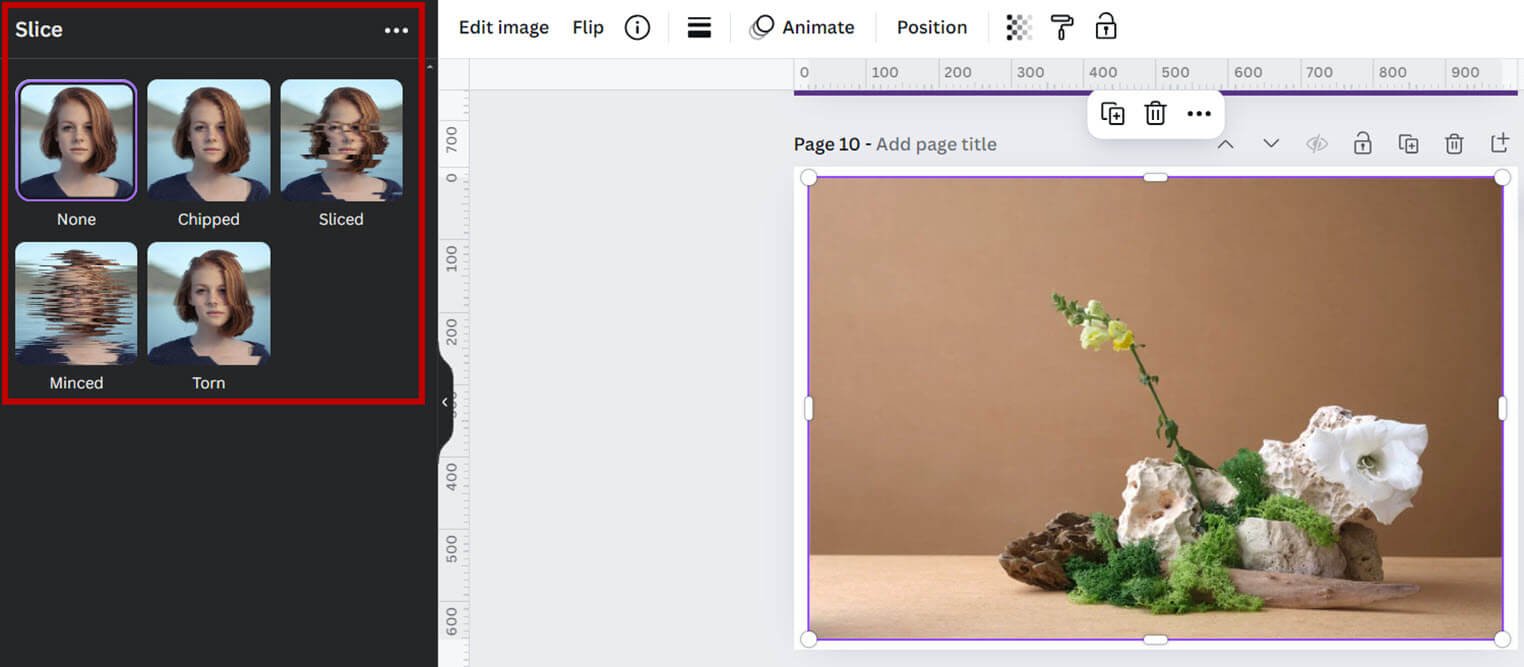
Select one that fits your design goals. At this point, you may need to experiment a little bit. Try different options to see which effect you need.
They are all quite close in terms of the effects, in my opinion, but there may be slight differences based on the image you are editing.
Besides, the effects also look different based on the exact parameters you choose, which brings me to the next point.

Get the latest Canva tips as soon as I post them!
Tutorials, hacks, updates, tips, and everything in between.
5. Adjust the Slicing Parameters
After you have selected a Slice option, you can adjust various parameters such as the number of slices, the offset, and the position to achieve the desired effect.
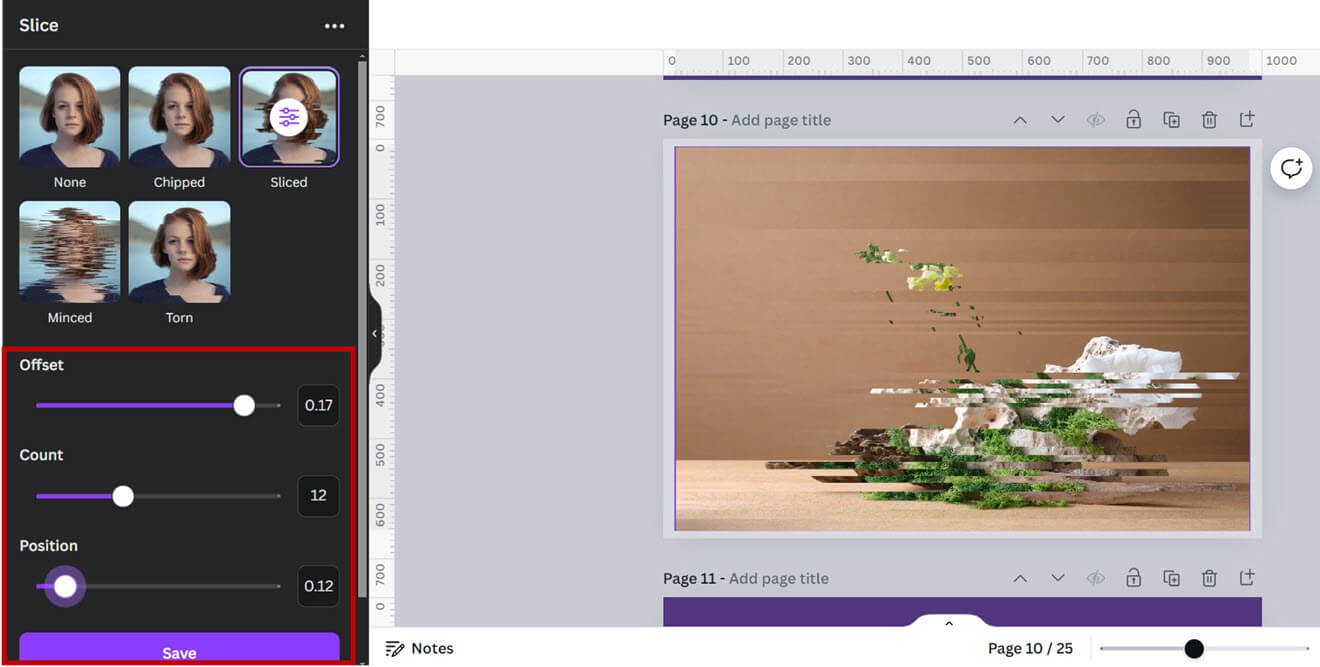
In this example, I chose ‘Sliced’ and adjusted the parameter sliders significantly to see the changes.
6. Apply the Changes
Once you are satisfied with the sliced look, click ‘Save’ to confirm the changes to your image.
Pro Tip:
Of course, you can also skip the Slice tool and apply a curve or line to slice your image, just like for text. It really depends on the effect you want for your design. If you like adding effects to images, also check out my post on how to curve an image, how to rotate, how to make landscape, and how to flip elements.
And there you have it—a step-by-step guide to slicing text and images in Canva that can elevate your designs to a professional level with just a few clicks.
Go ahead, experiment with slices, and let me know how it goes!

30-Day Free Access
Try out all Canva PRO features
- 1-Click Background Remover
- Create Designs in Bulk
- 1-Click Design Resize
- 100M+ Stock Content
- 600K+ Templates
- Transparent background PNG files

30-Day Free Access
Try out all Canva Pro features
- 1-Click Background Remover
- Create Designs in Bulk
- 1-Click Design Resize
- 100M+ Stock Content
- 600K+ Templates
- Transparent background PNG files
Other Canva tutorials you may like:
Pages & Elements
- How to change page orientation in Canva
- How to change to landscape in Canva
- How to flip elements in Canva
- How to rotate in Canva
- How to select all in Canva
Fonts & Text
Visual Effects
- How to add a gradient in Canva
- How to add drop shadow in Canva
- How to invert colors in Canva
- How to pixelate a photo
- How to change the color of an image in Canva
- How to mask in Canva
- How to curve an image
- How to select all in Canva
- How to Add an Outline to an Image in Canva: 3 Ways
- How to Cut Out an Image in Canva: 3 Ways
- How to Mask in Canva: Create a Clipping Mask Effect
Print & Business
- How much does Canva cost
- How to get Canva Pro for free
- How to do Canva mail merge
- Do Canva QR codes expire?
- How to add bleed in Canva
- How to change margins in Canva
- How to create a gang sheet in Canva
- How to Insert a Table in Canva In 1 Click
- Piktochart vs Canva 2024: The Complete Breakdown


