Table of Contents
ToggleHow to add bleed in Canva
Go to ‘File’ and select ‘Show Print Bleed’ to display extra space around your design. Ensure all important elements are within the safe area to avoid being trimmed off during printing. Download the file as PDF Print with crop marks.
If you don’t have a Canva Pro subscription yet:
When preparing a design for printing in Canva, it’s essential to include a bleed. A bleed is a buffer zone around your design that ensures no critical elements are cut off during the printing process.
What is a bleed in printing, and why is it important in Canva?
A bleed in printing refers to an area outside the final size of your document where the design extends so there are no white edges after trimming. In Canva, adding a bleed ensures that your background or important elements don’t get cut off during the printing process.
Here’s a video of how to add bleed in Canva.
And a quick guide:
1. Open Your Design
Launch your project in Canva. Create a new design from scratch or open an existing design you want to print.
2. Enable Print Bleed
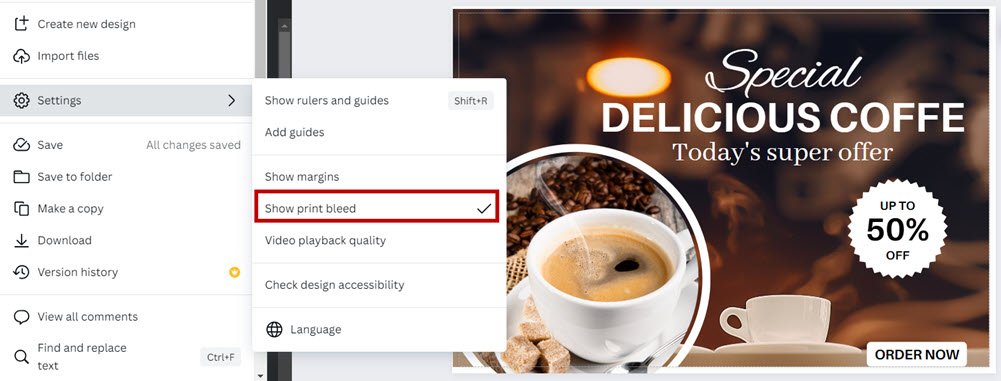
Go to ‘File’ -> ‘Settings’ and select ‘Show Print Bleed’. This shows extra space around your design with dotted lines.
Check that your layout fills the design and there is no white space.
In this example, I see that there is some white space above the bleed mark.
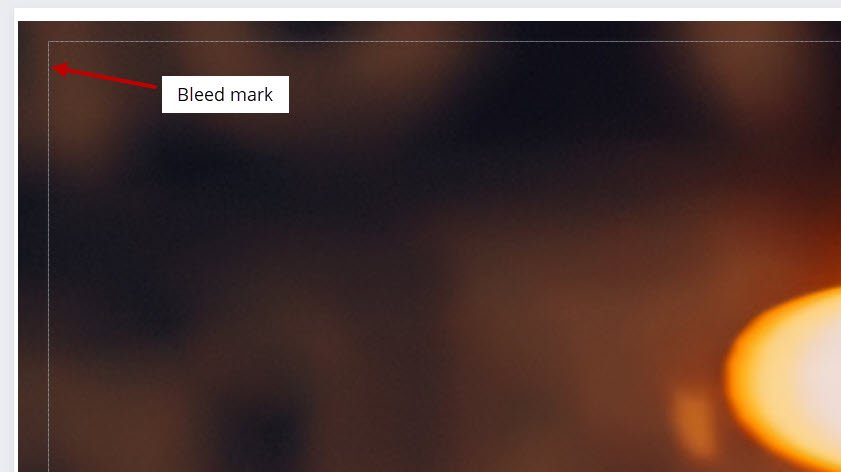
Make the image of your background bigger, and even go out of the canvas a bit to ensure that there is no white space.
Next, ensure that your crucial design elements like text and logos are within the safe area, away from the edges.
One way to know that is also to check the margins.
3. Show Margins
Again go to File -> Settings -> Show Margins.

Another grey dotted line will show inside the bleed line to indicate the margins.

Now, as you see, the CTA ‘Order Now’ is too close to the edge.
4. Adjust the Position of Elements
As you see in the screenshot above, the CTA element ‘Order Now’ is too close to the margins. It might get cut when you print.
It would be much safer to put it away from the corners, more towards the center.

Get the latest Canva tips as soon as I post them!
Tutorials, hacks, updates, tips, and everything in between.
5. Download Your Design
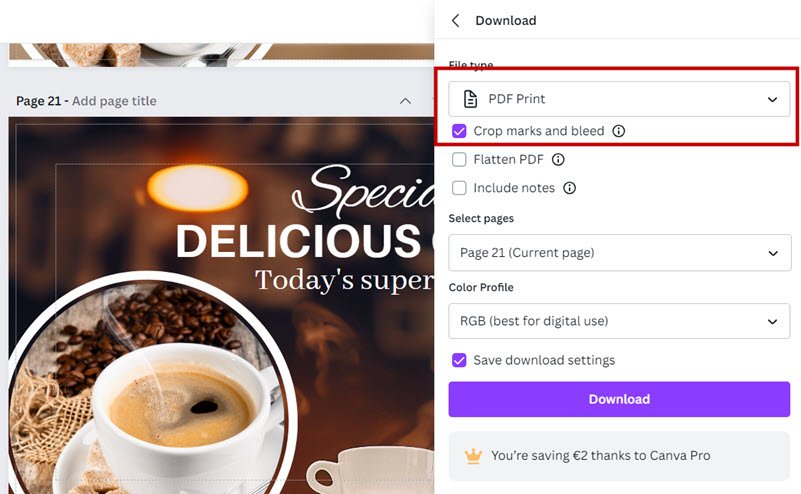
Choose ‘Share’, ‘Download’, and select ‘PDF Print’.
Opt for ‘Crop Marks and Bleed’ to include the bleed in your download.
6. Check the PDF
Open the downloaded PDF to ensure there are no unwanted white spaces and everything looks as expected.
In the first scenario, you see the white space around the image. I have added a red background so you can see the white.

Here is how the crop marks look like when you download.

See below the adjusted design with the image size increased and the CTA moved towards the centre. There is also no white space anymore.

And here are the crop marks with no white space.

So make sure you check your design with bleed marks and margins after you design it.
Then, you can download the design to check it again.
Once you are done and the design looks good, you can safely send it to the printer.
And that’s how you create a professionally printed piece without any part of your design getting chopped off.

30-Day Free Access
Try out all Canva PRO features
- 1-Click Background Remover
- Create Designs in Bulk
- 1-Click Design Resize
- 100M+ Stock Content
- 600K+ Templates
- Transparent background PNG files

30-Day Free Access
Try out all Canva Pro features
- 1-Click Background Remover
- Create Designs in Bulk
- 1-Click Design Resize
- 100M+ Stock Content
- 600K+ Templates
- Transparent background PNG files
Other Canva tutorials you may like:
Pages & Elements
- How to change page orientation in Canva
- How to change to landscape in Canva
- How to flip elements in Canva
- How to rotate in Canva
- How to select all in Canva
Fonts & Text
Visual Effects
- How to add a gradient in Canva
- How to add drop shadow in Canva
- How to invert colors in Canva
- How to slice in Canva
- How to pixelate a photo
- How to change the color of an image in Canva
- How to mask in Canva
- How to curve an image
- How to select all in Canva
- How to Add an Outline to an Image in Canva: 3 Ways
- How to Cut Out an Image in Canva: 3 Ways
- How to Mask in Canva: Create a Clipping Mask Effect
Print & Business


