You are here because you use the Windows Snipping Tool to take screenshots, you have heard of Snagit, and you want to know how they compare.
Whether you should get Snagit or not, or the Snipping Tool is enough.
So let’s start with the key differences, based on my honest review of both tools.
Snagit vs Snipping Tool: Summary Comparison
Snagit is a smart and advanced screen-capturing tool, and Snipping Tool is a basic, non-complex one.
The Snipping Tool is fine if you want to take simple screenshots or screen recordings. With Snagit, you can take 7 types of screenshots and detailed screen webcam recordings, and it also lets you do a lot more with those captures, like editing, highlighting, masking, etc. Besides, it offers you other tools like audio capture, third-party integration, custom themes, and easy sharing options. Snagit is also available on macOS and integrates well with other screen capture and image-sharing software.
The Snipping Tool is pre-installed on Windows and is free to use. Snagit is a paid software with a one-time purchase fee of $62.99 and comes with a 14-day money-back guarantee.
What is Snagit?
Snagit is more than a screen capture tool; it’s actually an annotation software, which is one that lets you add text, images, and other elements on digital content. So you can add arrows, callouts, shapes, and a content link in one click.
It’s helpful if you want to create instruction manuals, how-to guides, and user documentation and need lots of screenshots.
In fact, Snagit is not just about capturing; it’s about making your work faster and easier.
You can create professional and clean-looking documents quickly without needing a designer. The annotation tools, in particular, help you create edits that look polished and intentional, saving you time and effort.
Full disclosure, yes, I am an affiliate for Snagit, so if you click on my link and buy it at some point, I will get a little commission. But I am an affiliate because this tool has changed my life, saved me zillions of hours, and I want to share it with you as it can help you too.
What is Snipping Tool?
As you know, the Snipping Tool is a pre-installed screen capture tool on Windows that is really easy to use. You can do basic screen captures, and it is a good enough option if you need a simple, no-fuss tool for grabbing quick screenshots.
The tool is compatible with Windows 7, 8.1, 10 and 11.
Snagit vs Snipping Tool: Detailed Comparison
Here is a more comprehensive look at how Snagit and Snipping Tool compare to each other:
| Feature | Snagit | Snipping Tool |
| Cost | Paid ($62.99 one-time fee, with a 15-day free trial) | Free |
| Platforms | Windows, macOS | Windows |
| Screen Capture Options | Extensive (region, full screen, window, scrolling) | Basic (rectangular, free-form, window, full screen) |
| Annotation Tools | Extensive (texts, arrows, shapes, stamps, etc.) | Basic (pen, highlighter, eraser) |
| Video Capture | Yes (with audio and webcam recording) | Yes, but only available on Windows 11 |
| Image Editing | Advanced editing (effects, resizing, trimming, etc.) | Very basic editing (marking up images) |
| Sharing Options | Direct sharing to email, social media, cloud, quick links, etc. | No direct sharing; files must be saved first |
| Automated Workflows | Yes (automate tasks, presets for quick actions) | No |
| Multi-Image Capture | Capture multiple regions, windows, or full screens | Typically captures one window or region at a time |
| Scrolling Capture | Yes (capture long webpages and documents) | No |
| Optical Character Recognition (OCR) | Yes (extract and edit text from images) | No |
| User Interface | Customizable interface, easy to use | Simple and minimalistic |
| Support and Updates | Regular updates and customer support available | Limited to basic updates with Windows updates |
1. Screen Capture Options
Screen capture is the primary feature of both Snagit and Snipping Tool. With both tools, you can take quick screenshots of your desktop screen and perform essential editing functions like cropping, highlighting text, or erasing a previous activity on a screenshot.
The Snipping Tool offers four capture modes, including free-form, rectangular, window, and full-screen snips.
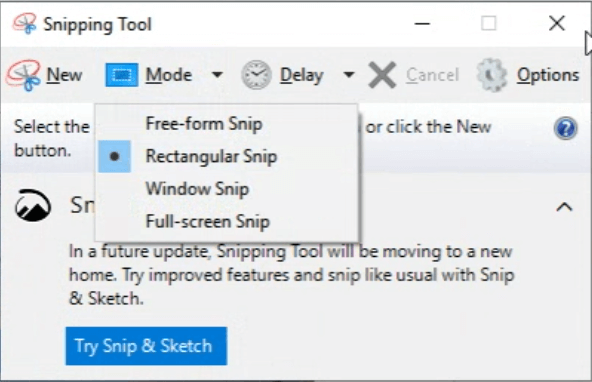
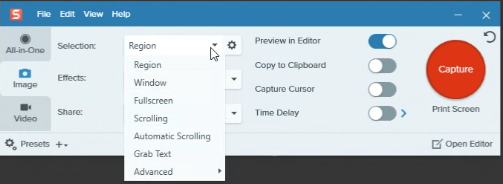
However, Snagit takes this a notch higher. Here’s a glimpse of the screenshots you can take with Snagit:
1. Region
Capture only a section of your screen, like the snipping tool.
2. Full screen
Capture an image of everything visible on your entire screen.
3. Window
Capture content that extends beyond the visible area of a window.
For instance, if you’re looking at a webpage or a lengthy document or even a long chat thread that requires scrolling to see the entire content, the Window Scrolling capture can capture all of it in one continuous image.
This is especially useful if you want to capture information from websites, PDFs, or other applications where the content doesn’t fit on one screen.
4. Scrolling content on your screen
Highlight the area of the screen you want to capture, then keep scrolling and everything you scroll through will be captured in the screenshot.
5. Automatic scrolling.
Highlight the area of the screen you want to capture and it will scroll and capture everything in the screenshot automatically.
You only have to click ‘Done’ when you want the scroll to stop.
6. Grab Text.
Capture only the text from a screen.
You can also record your screen while playing a video or performing a task.
Now, here’s my favorite part.
Snagit not only allows you to record your screen but also allows you to capture the system audio or microphone in the background.
This is a vital feature you’d find quite helpful if you’re someone who explains certain concepts about your products or services using tutorial videos.
2. Screen and Video Recording and Editing
You can record videos and sounds on your screen with both Snagit and Snipping Tool. However, there’s a significant difference in what you can achieve with each.
With the Snipping Tool, you get a basic video recording and editing feature. It allows you to record your screen, capturing either the entire screen or a selected area.

After recording a video, you can trim it to remove the unwanted parts. That’s as far as you can go with Snipping Tool.
Snagit offers quite in-depth video recording capabilities. You can capture your entire screen, a specific window, or a custom area.
You can also record webcam input alongside your screen, which helps a lot if you need to create tutorials, give a demo of processes, or make more interactive presentations.

Plus, Snagit also offers features annotations on your videos, just like in your images, which can help clarify your points and make your content more engaging. You can also trim and combine clips and add text overlays.
You can also share animated GIFs directly from your video captures. This is very useful if you want to show a process on your screen or share snippets of videos without needing a full video file.
2. Editing Capabilities
Creating professional-quality images and videos requires advanced editing features. This means that beyond cropping and resizing them, you might also need to annotate them to communicate better to your audience.
Snipping Tool allows you to perform basic editing of your screenshots. After capturing an image, you can annotate it with a pen or highlighter. If you make a mistake, you can use the eraser icon to erase your lines or highlights and start again.
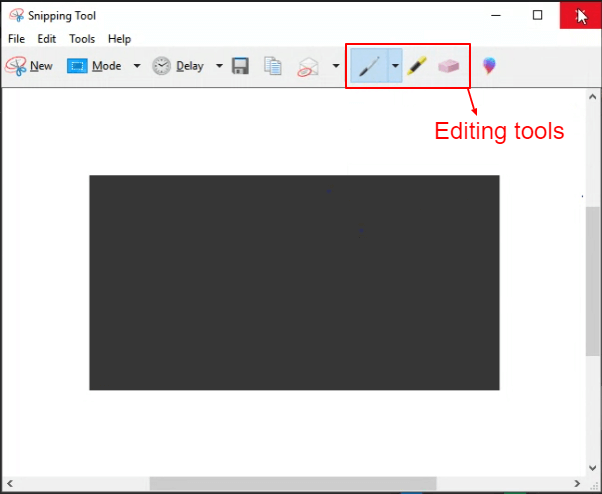
That’s as far as it gets on Snipping Tool. If you want more advanced editing, you can take your screenshots to Paint 3D from the Snipping Tool interface to further edit them.
Snagit makes screenshot editing seamless and fun, and also saves you so much time!
I can’t even begin to tell you how much time and hassle I save when I have to work on screenshots with Snagit.
Here are some of the annotation tools you can use with Snagit:
- Arrows
- Callouts in different shapes (with or without text)
- Numbered steps
- Blur an area of the screenshot
- Pixelate an area of the screenshot
- Cut out a section you don’t want
- Fill up a section with color
- Use the pen, line, or highlighter
- Magnify a section
- Move a section of the screen capture
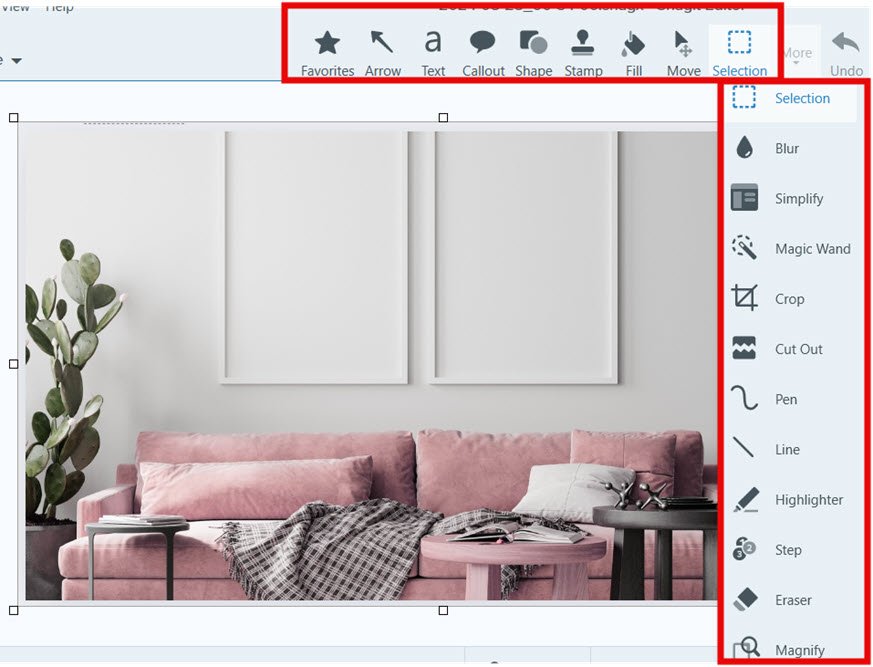
For instance, the Callout Tool offers customizable shapes and text annotations, while the Step Tool lets you add numbered steps to guide viewers through a process. With these features, you can transform your screenshots from basic images into clear, communicative visuals.
See this video to get a sneak peak at some of the features.
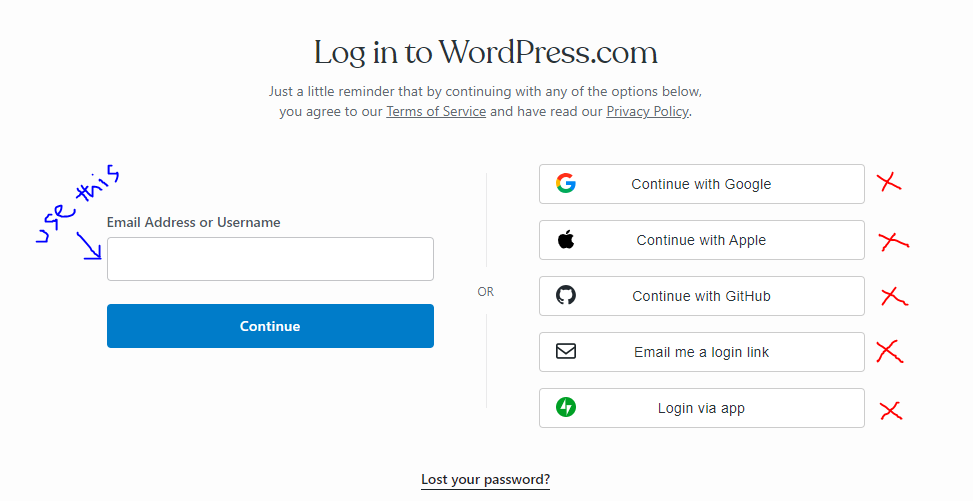
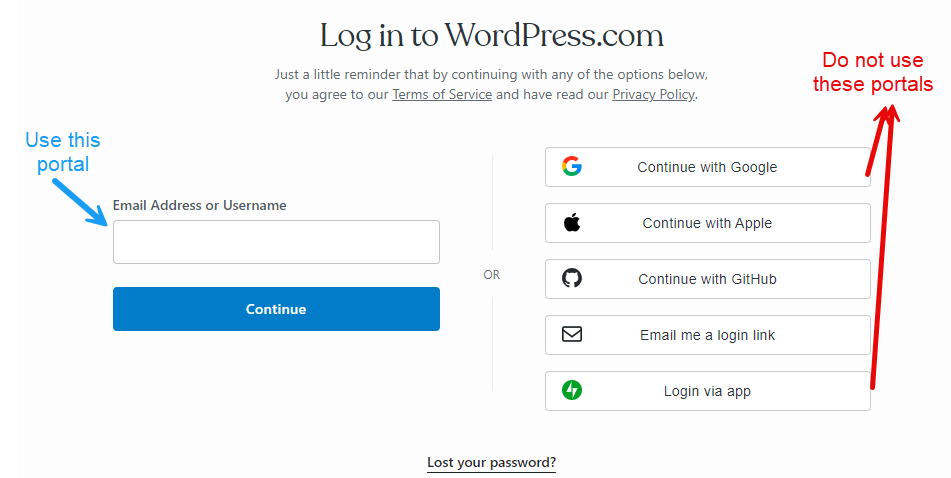
Here’s a simple difference that explains what you can achieve when annotating an image with Snipping Tool vs with Snagit.
With the Snipping Tool, you can only annotate with the pen tool, as seen below:
 However, when you use Snagit, this is how neat and professional your annotation will appear:
If you’re creating a visual guide, you can access templates on the Snagit editing platform to make your capture arrangements more professional.
You can also create custom styles and themes for your screenshots and save them, so you don’t have to set colors and line thicknesses and font sizes every time (though you can, if you want).
3. Image Quality
The Snipping Tool is handy for quick captures, but the images it produces might not be sharp enough for detailed or professional work.
Snagit, on the other hand, lets you create high-resolution images, making it perfect for creating crisp, detailed content like marketing materials or in-depth reports.
Snagit also lets you choose the resolution. I have tried both 72 dpi and 120 dpi, and they are both useful. I stick to 120 when I share the images in a presentation, as the size doesn’t matter.
But if I use the images for my website, I use 72dpi as I need smaller file sizes.
4. Platform Compatibility
Snipping Tool is pre-installed on Windows and is only available on Windows devices. Therefore, if you own a Windows 7, 8.1, 10, or 11, you already have full access to the tool. Needless to say, it doesn’t work on Mac.
On the other hand, Snagit was developed for both Mac and Windows operating systems. Unlike the Snipping Tool, Snagit doesn’t come pre-installed on any device with either OS. Use it wherever.
5. Third-party integration
When you’re working with images or screenshots, you might need to use other tools to help with your tasks.
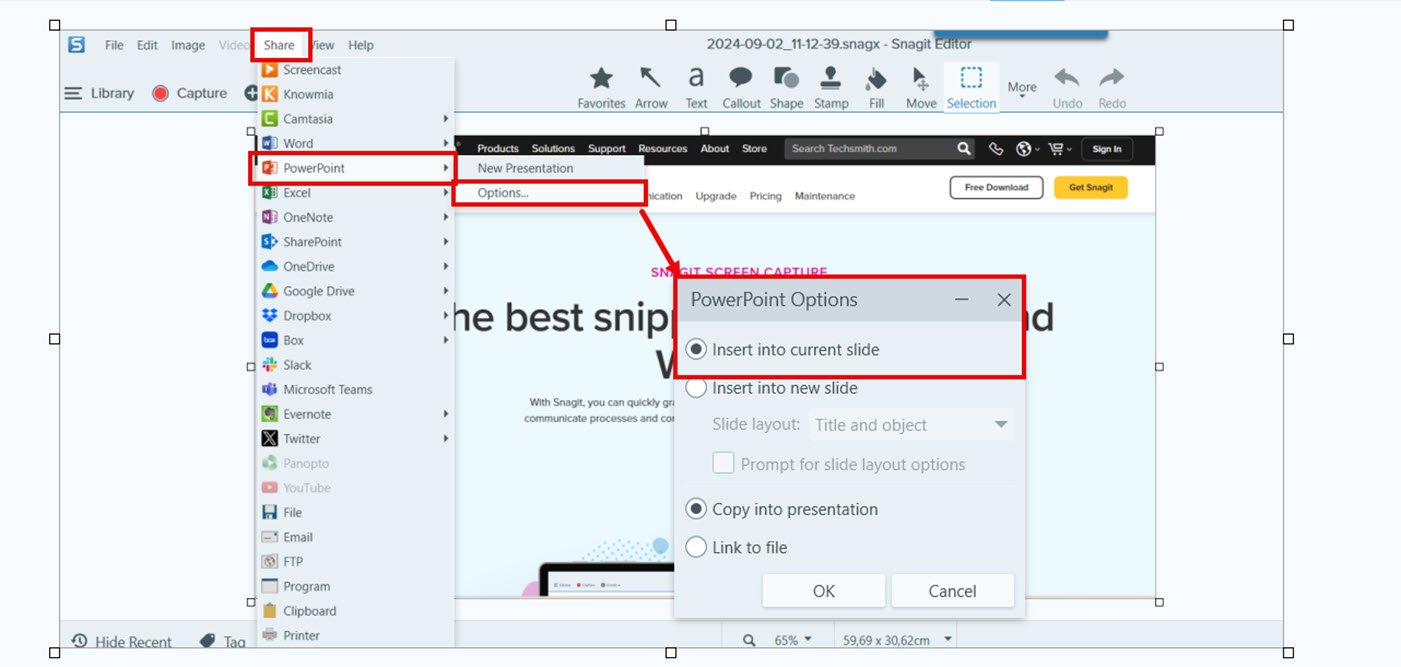
For example, you can be working on a presentation in PowerPoint and want to insert a screenshot with annotations. You can’t do this on PowerPoint.
So, what does this mean?
You need a snipping tool that integrates with other tools to make your work easier.
If you use the Snipping Tool to create screenshots, you can’t just share it to another app from the tool itself. You have to download it and upload it again.
That’s where Snagit comes in handy. It offers extensive integration with many applications like Microsoft Office, Google Drive, and Dropbox.
This makes it easy to capture, annotate, and add images directly into your projects with just a few clicks.
See the screenshot below which is also created with Snagit. You can directly share your screenshot into PowerPoint or other platforms.
6. Sharing Options
It’s not just integration, though. You create all that good content, you need to be able to share it.
The Snipping Tool only allows you to share your screenshots via email. It makes sharing your images via email easy, avoiding the manual process.

Snagit lets you share your images on multiple platforms, including Microsoft Office, cloud storage, social media platforms, and even screen-capturing tools like Camtasia and Screencast.
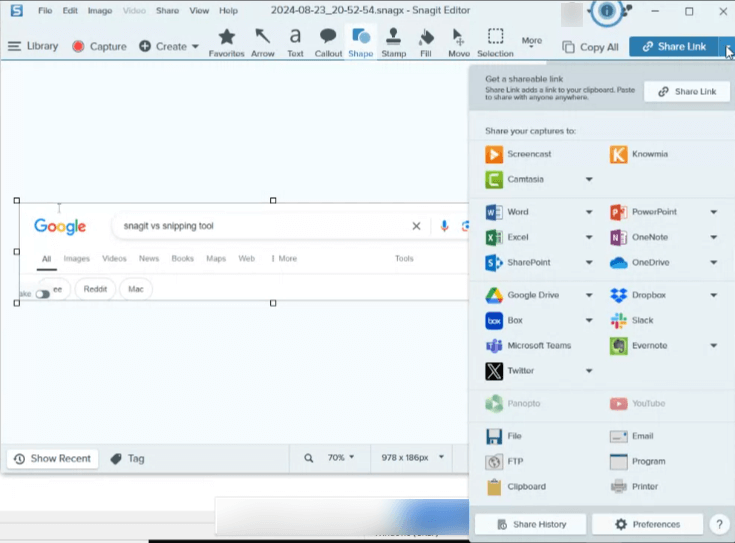
But the most fascinating feature for me here is that you can generate a unique link for your image and share it with anyone you want to give access to. Just share it with WhatsApp!
Additional features of Snagit
Here are extra features that make Snagit a much better screen capture tool than Snipping Tool:
1. Built-in library
I find the Snagit library feature very helpful because it helps me stay organized while working on a visual guide or content.
What does it do?
The Snagit library stores, organizes, and syncs your captures across devices so they are accessible to you and your teams.
For example, I can create screenshots, tag them with the project if I want, and save them there or save them to your local library or cloud.
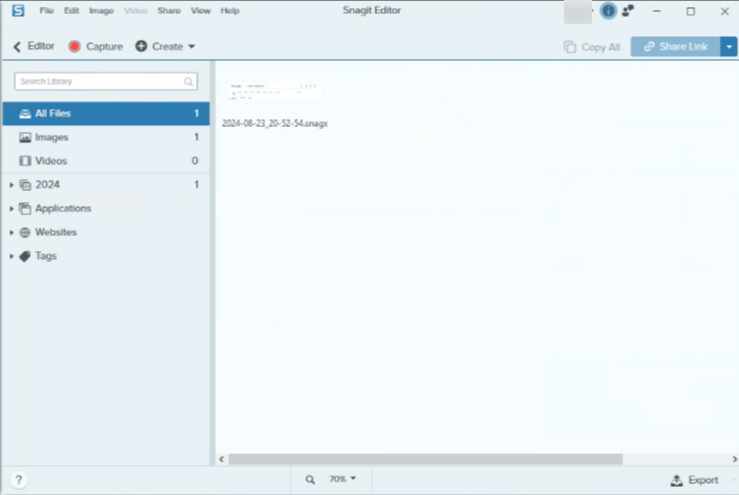
Snipping Tool does not have a built-in library for storing your screenshots.
That means you must save or share any screenshot you take before taking another one. Taking another screenshot without saving the existing one automatically deletes the existing one.
2. Optical Character Recognition (OCR)
The optical character recognition (OCR) feature is one of Snagit’s standout features. It enables you to extract text from an image, edit it, and even translate it.
When you take a screenshot or import an image into Snagit, the OCR feature scans the image for any text present. It then processes this text, converting it into an editable format you can copy, search, and modify as needed.
The OCR would be very helpful if you work with text-heavy images, such as scanned documents or detailed screenshots from websites, as you save hours of retyping.
This is a feature you won’t find on Snipping Tool, as it’s not built to do such sophisticated tasks. Check out all the Snagit features.
Snagit vs Snipping Tool: Pricing
Snipping Tool comes pre-installed on Windows at no cost. Snagit is available at a one-time purchase fee of $62.99. You also get a 15-day trial.
Snagit vs Snipping Tool: Pros and cons
Honestly, if you’ve read the notes above, you know that Snagit offers so many different features at such a low cost that I don’t see it having any cons, really.
The only point is that it’s not for free. But any tool that has so many features can hardly be free.
I always think of low-priced content tools like Canva and Snagit very highly. They have so many features and help you do so much visual editing that they are worth their weight in gold.
Of course, like Canva, Snagit is no Photoshop, and you can’t even expect it to be. Photoshop is a premium tool for designers.
Canva and Snagit are low-cost, everyday design and image editing tools for non-designers.
Regarding the snipping tool, I would say its pros are that you can take quick snippets for free and that it’s cheap. But it ends there.
Who should use Snagit?
Here are some of the people I think would really benefit with Snagit.
Professionals creating visual content
Ideal for marketers, educators, technical writers, and trainers who need to create detailed tutorials, how-to guides, and instructional content with annotations, steps, and clear visuals.
Content creators and designers
Perfect for designers, content creators, and social media managers who require high-quality images, GIFs, and videos to enhance their content and make it more engaging.
Software developers and IT professionals:
Useful for developers and IT professionals who need to document processes, create bug reports, or provide technical support with clear, annotated screenshots and screen recordings.
Teams collaborating on projects:
Great for teams who need to share and collaborate on visual content, especially when integrating with tools like Microsoft Office, Google Drive, and cloud storage platforms.
In conclusion…
If you need a simple, cost-free solution for quickly capturing no-fuss screen captures, the Snipping Tool is perfect.
However, for more advanced needs like detailed tutorials, professional editing, or sharing and third-party integration, Snagit is the smarter choice, despite its cost.
I actually use both.
Snipping Tool works for me when I have no additional information to add to a screenshot. I simply take a snip and use it for what I want without hassle. However, I use only Snagit for professional content I create as it makes my work neat, high-quality, and detailed.
Have you used Snagit, Snipping Tool, or both? If so, share your experiences in the comment section.
Other Snagit tutorials you may like:


