Pixelation is a fantastic way to obscure parts of an image, whether you’re trying to hide sensitive information or just add some artistic flair.
In this guide, I’ll walk you through the process of how to pixelate a photo or an image using two powerful tools: Canva and Snagit.
First things first: choose your tool.
Canva and Snagit offer different functionalities for pixelating images.
- Snagit is great for specific, detailed edits, especially when dealing with screenshots or specific areas of an image.
- Canva is suitable for quick, overall image pixelation and it provides broader graphic design features.
If you don’t have the tools currently, start with free trials.
Here is a video that explains the process in detail. You could also check out the steps in the post below.
How to Pixelate an Image with Snagit
Step 1: Open Snagit
Start Snagit and ensure that it’s ready for use. You can do this either by opening the Snagit Editor 2024 directly or taking a screenshot that you wish to edit.
Step 2: Import Your Image
If you haven’t taken a screenshot directly, you can import an image into Snagit. Click on ‘File’ in the top menu and select ‘Open’ to choose an image from your computer.
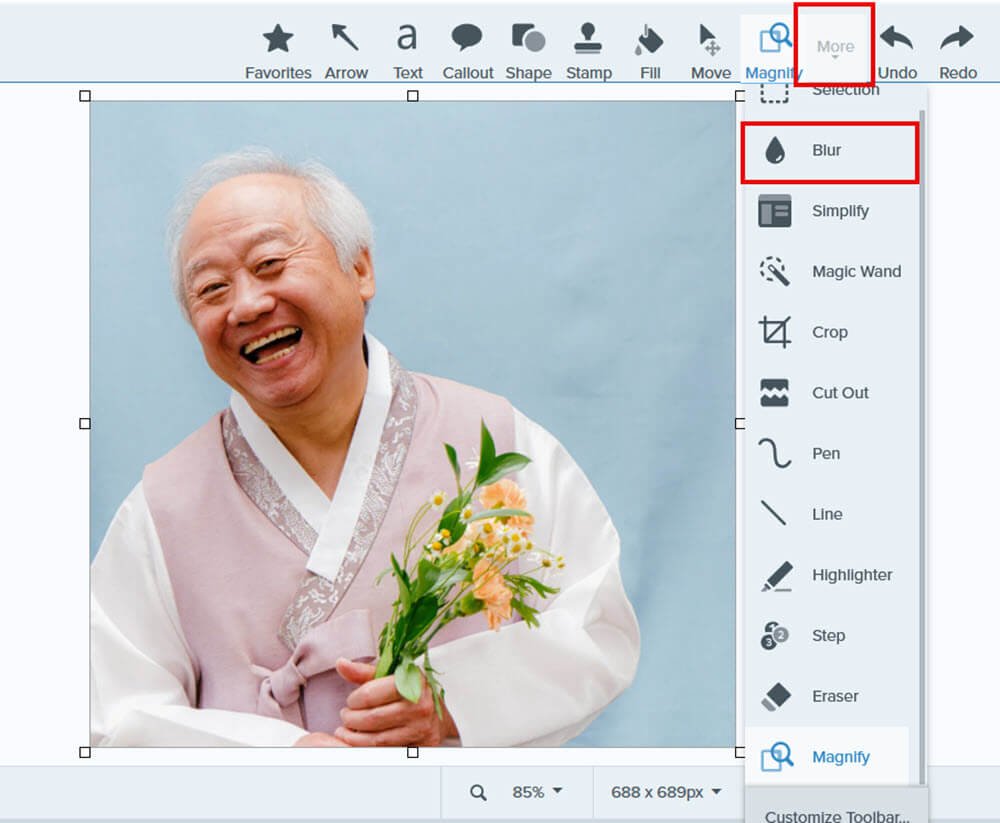
Step 3: Select the Blur Tool
Click on the ‘More’ button in the toolbar to expand the additional tools menu.
Select ‘Blur’ from the list to access the blur and pixelation options.

Step 4: Choose the Pixelation Type
In the tool properties, choose one of the pixelation styles.
You can choose a low level or pixelation, depending on how much you need.
But don’t worry about choosing the perfect one exactly. Yo can also modify the pixelation later.
![]()
Step 5: Apply Pixelation
On your image, click and drag to draw a box around the area you want to pixelate.
Once you release the mouse, Snagit will automatically apply the pixelation to the selected area.
![]()
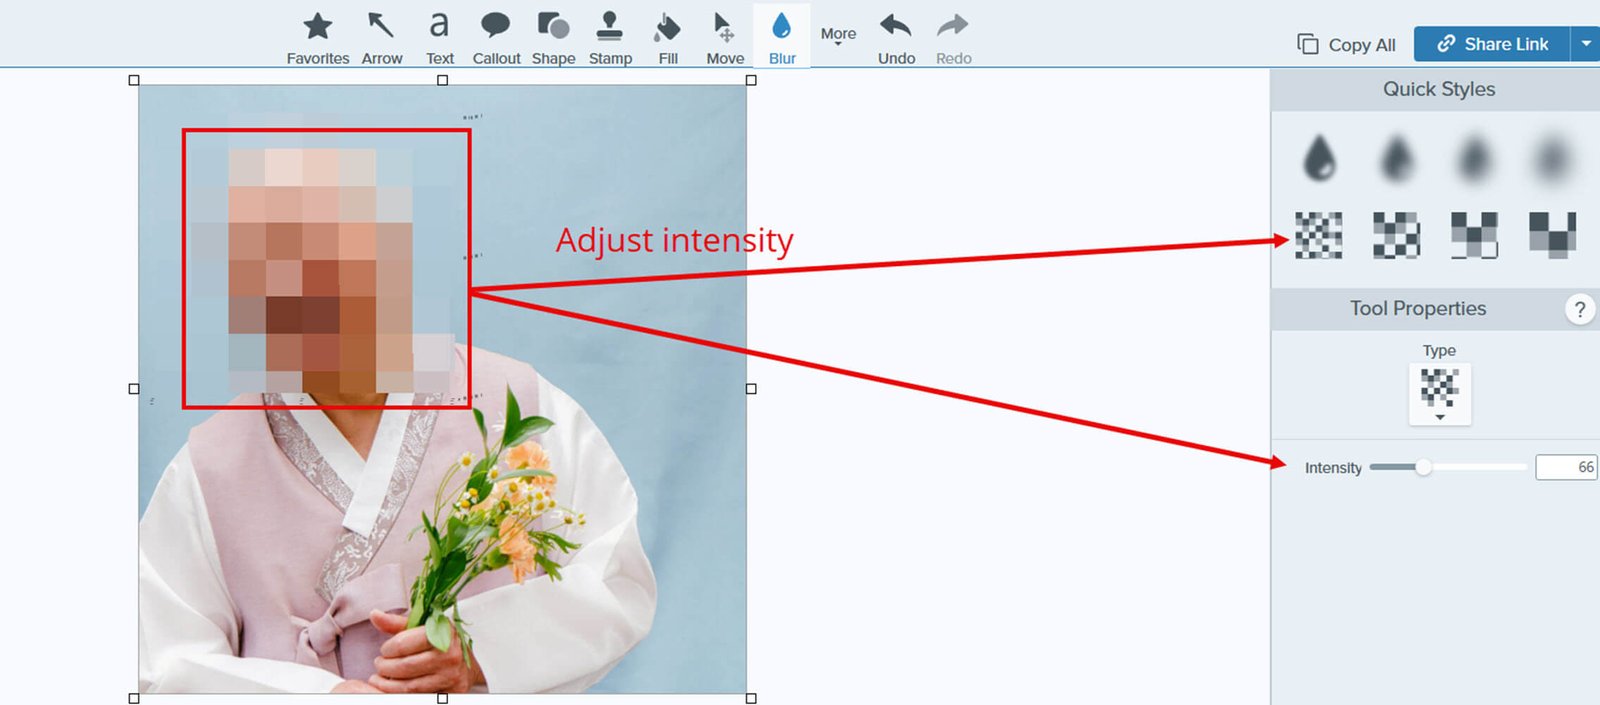
Step 6: Adjust the Intensity
Adjust the intensity of the pixelation using the slider in the tool properties.
Moving the slider will change how obscured the pixelated area is. Experiment with this setting to find the desired level of pixelation.

Step 7: Fine-Tune Your Edits
If you need to adjust the area of pixelation, you can resize the pixelated box by dragging its corners or edges.
To move the pixelated area, click inside the box and drag it to a new position on the image.
Step 8: Save or Export Your Image
Once you are satisfied with the pixelation, save your image by going to ‘File’ and selecting ‘Save As’. Choose the desired format and location to save the edited image.
Step 9: Share or Use the Image
With your image now pixelated, you can use it in your documents and presentations or upload it directly if Snagit is connected to your cloud storage or social media.
These steps will help you efficiently use Snagit to pixelate specific areas of your images, providing a balance of privacy and visibility as needed.
How to Pixelate an Image or Photo with Canva
Here is a step-by-step process.
Step 1: Access Canva
Open your browser and log in to your Canva account.
Select the design type or open an existing project where you want to pixelate an image.
Step 2: Upload and Add Your Image
If your image isn’t already uploaded to Canva, you can do so by clicking on the ‘Uploads’ tab on the left-hand side and then on ‘Upload an image or video’.
Drag the uploaded image onto your canvas.
Step 3: Search for the Pixelify app
In the left-hand side panel, click on the ‘Apps’ tab.
In the Apps search bar, type “Pixelify” and press enter. You will see the Pixelify app icon appear; click on it.
![]()
Step 4: Apply Pixelation
Once you click on Pixelify, a new window will open, showing a preview of your image.
Below the preview, you’ll find a slider labeled ‘Pixel Scale’.
Move this slider to adjust the level of pixelation. A higher number on the scale results in more pronounced pixelation, as shown in the previews you provided.
Step 5: Adjust Pixelation
Just like with Snagit, in Canva as well, you can adjust the pixelation until you reach the desired effect.
You can switch between the preview and your canvas to see how it looks in the context of your overall design.
Here is an effect of high pixelation.
![]()
And here is relatively less of a pixelation effect.
![]()
Step 8: Apply Changes
Once satisfied with the pixelation level, click ‘Replace’ to apply the pixelation effect to the image in your design.
Difference between Canva and Snagit
The biggest difference between Canva and Snagit in terms of pixelating images is that Canva only lets you do basic pixelation across the whole image and Snagit offers more detailed control, allowing you to pixelate specific areas of an image.
![]()
Which method should you choose?
Choosing between Canva and Snagit for pixelating images depends on your specific needs:
Use Canva if you’re primarily doing graphic design and want to pixelate entire images quickly.
Use Snagit if you require more precision in pixelating specific areas of an image, and you’re editing screenshots or need to make detailed annotations.
My Preference:
I always prefer Snagit for pixelating images simply because of the level of control it gives me.
Pro Tip: Use both Canva & Snagit
If you need to pixelate only a part of an image, but you need to apply it within another graphic design, use both tools.
Pixelate it in Snagit, and then upload it to your design in Canva!
Here are more posts you may like on image editing:


